Saturday, March 19, 2011

Strawberry Vanilla Bean Ice Cream

This recipe is really different than any other ice cream I have made so far because it has sour cream in it. But before you go running away or turn up your nose in disgust at the inclusion of sour cream in ice cream, hear me out. It really is the sour cream that gives it the creamy taste and texture. This ice cream is ripe with intense strawberry flavor and the sour cream makes it super creamy while keeping it from being overly sweet. I would bet that anyone tasting this would never guess it has sour cream in it. What I do know is that this is for sure the best strawberry ice cream I have had.

I also added one vanilla bean to pair nicely with the strawberries and because I'm a sucker for those little vanilla bean flecks in just about anything. If you don't have any, that's ok. They are completely optional. But if you do...I highly recommend using the vaniila bean. It really adds that "something extra" to make this an amazing ice cream.


Strawberry Vanilla Bean Icea Cream

1 lb. fresh strawberries, rinsed, hulled and sliced*
¾ cup sugar
1 tbsp. vodka (optional)
1 vanilla bean, split lengthwise with the seeds scraped from inside
1 cup sour cream
1 cup heavy cream
½ tsp. freshly squeezed lemon juice

Directions:
Combine the sliced strawberries in a medium bowl with the vanilla, sugar, and vodka. Stir until the sugar begins to dissolve. Cover and let stand at room temperature for 1 hour, stirring occasionally.

Transfer the mixture to the bowl of a blender or food processor and add the sour cream, heavy cream and lemon juice. Pulse briefly until almost smooth but still slightly chunky. Chill in the refrigerator for 1 hour. Freeze in an ice cream maker according to the manufacturer’s instructions.

*Note: If you can find locally grown, farmstand strawberries, I really do recommend them for this recipe. The difference in flavor really is noticeable. You definitely get a stronger strawberry flavor than with typical supermarket berries. However, if your only option is the store-bought kind, that's ok...this recipe is still great!

Thursday, March 17, 2011

Happy St. Patrick's Day!

While I don't have a new post for you (too busy whipping up cookies for work, daycare, and The Husband!) I would like to redirect you to last year's posting of Corned Beef and Cabbage. It's definitely what I will be making this year too (and hopefully getting a better picture of it!)...although I think we're celebrating a few days late. I plan to make this Saturday :) What other delicious goodness do you have planned for this year? Green Beer anyone?

Sunday, March 13, 2011

Chicken Fried Steak

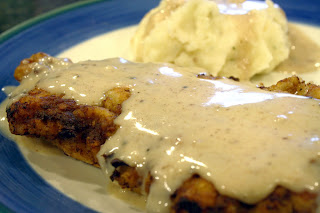
There’s nothing special about this dish, except that it’s a total southern miracle of fried beef smothered in gravy.

It’s Chicken Fried Steak, is what it is. I made it for my husband last night because he's pretty great and although I try to cook healthy foods throughout the week, sometimes the food that's not so great for you just tastes so darn good!!! Don't mind the bad lighting...we were enjoying this so much that we didn't get in a good picture until after it was dark and that's killer for food photography!!

Anyway, make this for someone you like, they'll probably like you back - but you might also want to plan a workout session afterwards ;)

Chicken Fried Steak
about 8 servings

3 pounds Cube Steak (tenderized Round Steak That's Been Extra Tenderized)
1-½ cup Whole Milk, Plus Up To 2 Cups For Gravy
2 whole Large Eggs
3 cups All-purpose Flour
Seasoned Salt
¼ teaspoons Cayenne
LOTS Of Black Pepper. Lots.
Canola Oil, For Frying
Salt And Pepper, For Both Meat And Gravy


Begin with an assembly line of dishes for the meat: milk mixed with egg in one; flour mixed with spices in one; meat in one; then have one clean plate at the end to receive the breaded meat.

Work one piece of meat at a time. Season both sides with salt and pepper, then dip in the milk/egg mixture. Next, place the meat on the plate of seasoned flour. Turn to coat thoroughly. Place the meat back into the milk/egg mixture, turning to coat. Place back in the flour and turn to coat.(So: wet mixture/dry mixture/wet mixture/dry mixture.) Place breaded meat on the clean plate, then repeat with remaining meat.

Heat oil in a large skillet over medium heat. Drop in a few sprinkles of flour to make sure it’s sufficiently hot. Cook meat, three pieces at a time, until edges start to look golden brown; around 2 to 2 1/2 minutes each side.

Remove to a paper towel-lined plate and keep warm. Repeat until all meat is cooked.

GRAVY:
After all meat is fried, pour off the grease into a heatproof bowl. Without cleaning the pan, return it to the stove over medium-low heat. Add 1/4 cup grease back to the pan. Allow grease to heat up.

Sprinkle 1/3 cup flour evenly over the grease. Using a whisk, mix flour with grease, creating a golden-brown paste. Keep cooking until it reaches a deep golden brown color. If paste seems more oily than pasty, sprinkle in another tablespoon of flour and whisk.
Whisking constantly, pour in milk. Cook to thicken the gravy. Be prepared to add more milk if it becomes overly thick. Add salt and pepper and cook for 5 to 10 minutes, until gravy is smooth and thick. Be sure to taste to make sure gravy is sufficiently seasoned.
Serve meat next to a big side of mashed potatoes. Pour gravy over everything and enjoy!

Source: The Pioneer Woman

Double Peanut Butter Ice Cream

I tried a new flavor of ice cream and this is one of the best flavors I have made. This recipe is great because if you are like us and consider peanut butter a pantry staple, chances are you have everything you need to make it on hand. The only thing we needed to buy were the Reese’s cups. (I try not to keep these in the house because somehow they dissapear from the pantry and reappear on my hips...it's the weirdest thing...)
It seems a fact of nature that chocolate and peanut butter are a perfect pair, and this ice cream was certainly evidence of that. I think the peanut butter base would also be fantastic with a fudge ribbon through it ...mmmm....alright - let's get to eating!

Double Peanut Butter Ice Cream
¾ cup creamy peanut butter
¾ cup plus 2 tbsp. sugar
2 2/3 cups half-and-half
Pinch of coarse salt
Dash of vanilla extract
1 heaping cup mini Reese’s cups, wrappers removed, frozen and chopped

Combine all of the ingredients (minus the candy) in a blender or food processor; and puree until completely smooth. Chill the mixture thoroughly in the refrigerator. When the mixture is chilled through, freeze in an ice cream maker according to the manufacturer’s instructions. To mix in the Reese’s, transfer the ice cream to a storage container and gently fold in the peanut butter cup pieces until evenly distributed.

Adapted slightly from The Perfect Scoop by David Lebovitz

Saturday, March 5, 2011

White and Dark Hearted Brownies

I found this recipe when looking for a really tasty brownie for a friend who was in the hospital. Nothing says "Get Well Soon!" like a big plate of brownies. I came across these at Smitten Kitchen and fell in love. They are not only the cutest little brownies I have ever seen, but they had the perfect sentiment.

I was a bit hesitant about the white chocolate brownies because I'm not a huge white chocolate fan. However, these were really good....amazingly good even. Don't tell anyone, but I actually think I liked them better than the dark chocolate brownies. Maybe it was because they had a little dark chcolate heart belly, but the combination of flavors was out of this world. I also loved that they still remained very much a "brownie" to me - rich and chewy, the way a good brownie should be.
I hope you try it soon - and feel free to make the bellies whatever mini shape you have - I think these would be a very welcomed non-green treat for St. Patty's Day and little shamrocks would be irresistible!
White and Dark Hearted Brownies
**This recipe makes 16 2-inch square white or dark chocolate brownies. To make a pan of each and reverse the middles, you’ll need double the ingredients listed below. You will end up with 32 reversed-center brownies.

4 ounces (this was 1 bar for me) semisweet or good white chocolate (I used Ghirardelli for both), coarsely chopped
1 stick unsalted butter
3/4 cup plus 2 tablespoons sugar
2 large eggs
1 teaspoon vanilla
1/4 teaspoon salt
2/3 cup all-purpose flour
1-inch heart or other shaped cookie cutter

Preheat oven to 350°F. Line an 8×8-inch square baking pan with foil, with ends of foil extending over opposite sides of pan. Repeat with second piece of foil in opposite direction. Grease the foil.
Melt white or dark chocolate and butter together in a large bowl over a simmering pot of water until it is melted; remove from heat and stir the mixture until it is smooth.

Whisk in sugar. Whisk in eggs, one at a time, then vanilla. Add flour and salt together, stirring until just combined. Spread into prepared pan and bake for 25 to 30 minutes (for the dark chocolate version) and 30 to 35 minutes (for the white chocolate version).

Repeat this recipe with the other kind of chocolate and a second 8×8-inch square pan. Cool pans on a wire rack in the freezer if you’re going to make cut-outs; frozen brownies are much easier to make clean cuts from. Once solid, transfer brownies in their foil “sling” to a large cutting board and cut each pan of brownies into 16 even squares, about 2×2 inches each.

Still cold (and if they warm up and soften too quickly, pop them back in the freezer for 5 minutes), carefully, slowly, gently, press your cookie cutter into the center of each brownie and set the cut-out aside. Insert the dark cut-outs into the centers of the light brownies, and vice-versa. From here, you can let them warm up to room temperature or wrap them up in the freezer until you will need them.
adapted very slightly from Smitten Kitchen